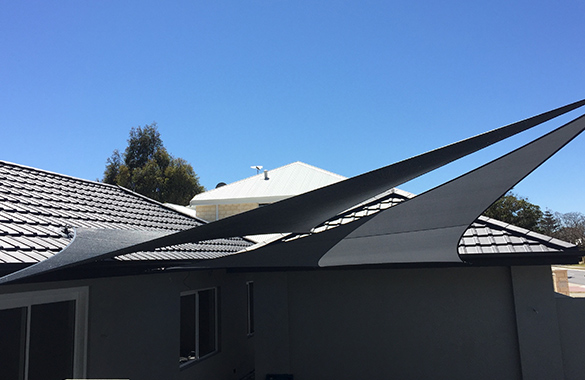
So why buy a custom built shade sail from a professional shade installation company?
DIY

Welcome to ONE Shade Sails Perth ‘s DIY shade sail guide, we aim to give you an overview of the design and installation requirements you need to take into consideration when planning a shade sail. Shade sails installed in Perth need to be build to withstand our climate. Perth is one of the windiest cities in the world, so shade sails need to be designed, fabricated and installed taking this into consideration. ‘ONE Shade Sails’ only use high quality products that have been specifically designed for tensioned fabric structures.
The Five Steps
The ONE Shade Sails Perth joint venture installation guide below, enables our customers to be as involved with the process as they feel comfortable.
Planning your shade sail
Installation of the hardware
Ordering your shade sail
Measuring
Installing your shade sail
Planning For Your Shade Sail
The first step of this process is to sit down and consider what you want to achieve. The following issues will determine where and what fixings you are going to require.
The Sun
Throughout the day the sun will move from east to west position the sail with this in mind.
For example, If you are looking to provide shade late in the afternoon consider lowering the westerly fixing points.
The Wind
Perth has a prevailing southwesterly wind. Having a low fixing point on the south westerly corner will encourage the wind to flow over the sail rather than getting trapped underneath and creating turbulence.
No Strait Edges
Sails use hollows/curves in the edges to aid tensioning. As the corners of the sail are tensioned the edge hollows/curves try to straighten, this in turn pulls the fabric in the center tight. To reduce the gaps between multiple sails consider overlapping the edges.
Fixings
Is there the opportunity for creating attachment points on existing structures, or do you need to install steel posts?
Will attaching to an existing structure compromise the design requirements of the sail? For example, attaching to a rafter will restrict the height of your fixing point.
Design
Shade sails work best and look more appealing when they are designed to have a “twist”, this is known as a hypar shade. To achieve this the fixing points must be installed at different heights. The hypar shade is not just for looks, it stops the sail flapping in the wind and collecting water. Incorporating the opposite high and low fixing points the shape of the sail aids tensioning. The high points are trying to pull the fabric up and the low points trying to pull the fabric down, by inducing the twist the sail is not only relying on the edges for tension.
If the sail is a triangle or installed on a flat plane, a minimum fall (slope) of 1:4 is required for water run-off. Please note that a triangular sail is not very functional, 50% of the sail is lost due to the curved edges. If you do want triangles we urge you to consider installing more than one sail, this allows you to created an overlapping effect, enhancing the design and functionality of the sails. To avoid long thin corners triangles should be made equilateral.
Size
When the sail is manufactured, we will reduce the size to allow for rigging screws and stretch factors. Hollows will be cut into the edge of the sail, a rough guide to this is that the depth of the hollow (center of the edge) is 10% of the edge length.
Fixing points
All ‘One Shade Sail’ fixing methods have been pre approved by our consulting engineer.
Existing Structures
Check with your local authorities and your home insurance policy. It is imperative when considering fixing to existing structures, that the point loading of a shade sail is not underestimated. For the best safety practices, you should remove your sail when severe storms are forecast.
Steel Posts
The size of the shade sail will determine the specification on the steel support posts. Typically domestic shades will use 100x100x4or5mm square hollow section (SHS). Our posts are galvanized (ensuring rust protection) and then powder coated in a colour of your choice.
Post Footings
Footing sizes vary depending on the size of the structure and the height of the post above ground level. Generally the average domestic shade will have a 600x600x1000mm hole, and 0.3m2 of 20/20/80 concrete.
Council Approval
You should check with your local authorities as to relevant building regulations. There are vast differences between councils across the Perth, some councils do not require permission for shade sails where as others do. Checking now will avoid any disappointment at a later date.
Measuring
In order to manufacture a quality shade sail, we require measurements accurate to 5mm, we will advise you as to the measurements required. Remember to measure twice as a check!
Please note at this stage you may wish to enlist our services, if we get it wrong its not your problem!
Ordering
To order, send us the measurements and allow 10 working days for the fabrication of the shade sails.
Installing
There are two types of shade sails, those with webbing along the edges and those with a wire running though a pocket around the perimeter.
When you receive your shade sails you will find the One Shade installation and maintenance guide.
IMPORTANT Please note this is a guide only, One Shade Sails Perth takes no responsibility for DIY structures.
Please remember at one shade sails perth, our relationship with our customers does not end here. We are available for all repairs; maintenance; re – designs & ideas you would like to explore with your shade sails.
